Introduction to the ISF Quick Start
If you are already somewhat familiar with programming, this quick start guide is a quick way to learn the basics of creating GLSL shaders to meet the ISF specification. Shaders written in the Interactive Shader Format, also known as ISF, can be used as visual generators, effects and transitions in supported software.
For a more in depth lessons on learning GLSL and ISF you can read the ISF Primer. Additionally the ISF Reference Pages are a useful set of documents to keep on hand when writing and remixing ISF compositions. Developers interested in supporting ISF in their own software can visit the ISF Specification Page for detailed information and links to useful sample code.
Finally, the ISF Test/Tutorial filters contains many useful test ISF compositions that are useful references and the standard set of shaders that we include with VDMX can be found in the ISF Files repository on GitHub.
In this document we will cover the basics of using and writing shaders in ISF.
Using ISF Compositions
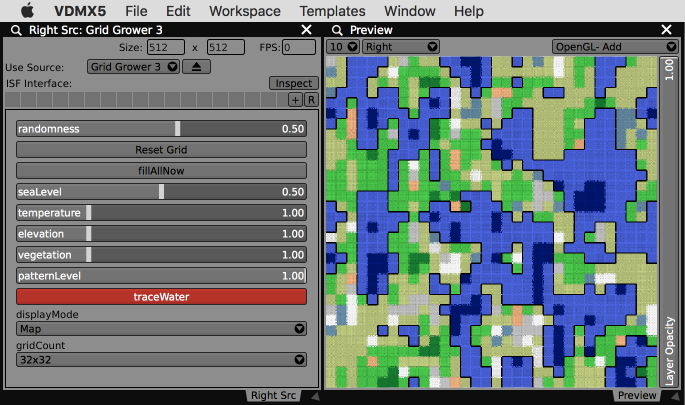 ISF composition being used as a source file in VDMX.
 - Shaders written in the ISF specification can be used in supported environments on desktop, mobile and the web. To use ISF files in a specific piece of software consult the appropriate documentation.
- In many cases you may have certain ISF files, such as the standard set of generators and filters, that you would like to be globally available to all software on your computer.
- MacOS- ISF files should be installed in
/Library/Graphics/ISF(if you want them to be available for all users on your system) or~/Library/Graphics/ISF(if you only want them to be available to your user account). ISF files installed in either of these locations will be available to all applications: application-specific ISFs should be installed in/Library/Application Support/app nameor~/Library/Application Support/app name, or as specified by the software.
- MacOS- ISF files should be installed in
- Windows- Ideally, global ISFs should be placed in
/ProgramData/ISF, but different apps may check different locations.
- Windows- Ideally, global ISFs should be placed in
- ISF files can be created, viewed and shared online at the interactiveshaderformat.com website. Compositions from this site can be downloaded and used in your host software of choice.
- ISF shaders can be made as full page standalone webpages, with or without controls. An example implementation can be found in the ISF Generator Example on Glitch.
Additional discussion and examples can be found in the ISF Primer chapter on using ISF Compositions.
Creating ISF Compositions
You can create ISF compositions using a variety of different tools:
- There is a free ISF Editor online.
- There is a free ISF Editor for Mac and Windows.
- You can use any standard text editor. If you are using an app like TextEdit, make sure to use the "Make Plain Text" option from the "Format" menu.
- Additional discussion about development tools can be found in the ISF Primer chapter on creating ISF Compositions.
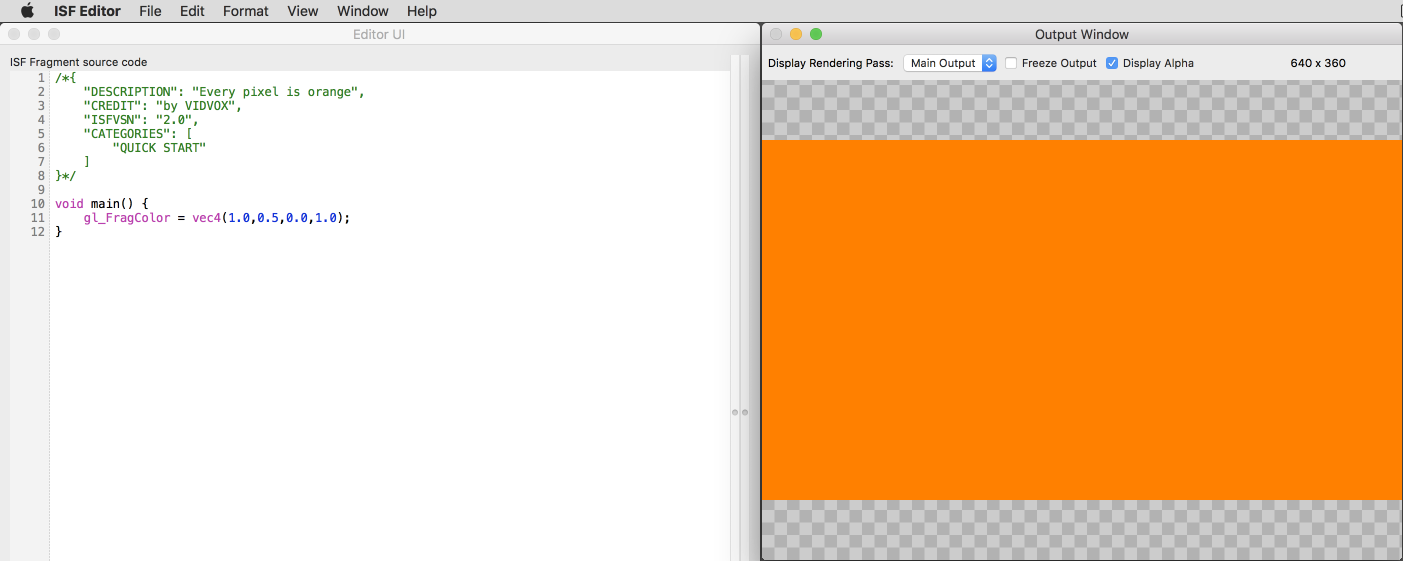 Every pixel is orange example in the ISF Editor.
 To create your first ISF composition, open the tool of your choice, create a new file and save it with the title "All Orange.fs".
In this case the ".fs" file extension stands for "fragment shader" which is the particular type of shader we will be writing for this first example.
Copy and paste the following code into the text editor area and then save the document. If you are working one of the live updating apps, your output should render a solid orange color. If you are working in a text editor, you should be able to load the "myshader.fs" into the host application of your choice as a generator file.
/*{
	"DESCRIPTION": "Every pixel is orange",
	"CREDIT": "by VIDVOX",
	"ISFVSN": "2.0",
	"CATEGORIES": [
		"TEST-GLSL FX"
	]
}*/

void main() {
	gl_FragColor = vec4(1.0,0.5,0.0,1.0);
}
This ISF composition is made up of two parts - a JSON blob at the top that describes the shader and below that is section of GLSL code. The contents will vary but every ISF composition you create will have these two things in a .fs file.
- In the JSON section, the
DESCRIPTION,CREDIT, andCATEGORIESattributes are meta-data that can be used to include useful information about the purpose of the shader, who created it and which category groups the host application should include in. TheISFVSNattribute tells the host which version of the ISF specification this shader was written against. Though each ISF composition must include a JSON section, many of the attributes are optional and several are only used in specific circumstances. The ISF JSON Reference contains a detailed listing of the available options for this section. - In the GLSL section is our
void main() {}function in which the variablegl_FragColoris set to the color orange. By convention, this function is called by host applications to render each shader and must be included.
From this starting point, you can replace the contents of the void main() {} function with other code and set gl_FragColor to any other color. With GLSL, the code in this function will execute simultaneously for every single pixel in your image.
This is further detailed in the ISF Primer chapter on the anatomy of an ISF composition.
Automatically Created Uniforms and Variables in ISF
Within the ISF specification, there are several useful uniforms that are always available to use within your shaders.
A few of the most important automatic uniforms in ISF are:
isf_FragNormCoordwhich contains the normalized (0.0 to 1.0) coordinate.TIMEandFRAMEINDEXwhich can be used to animate compositions over time.RENDERSIZEwhich contains the pixel dimensions of the output being rendered.
Try creating a new shader called "cartesian coordinates.fs" and pasting in the following code:
/*{
	"DESCRIPTION": "Show coordinate space",
	"CREDIT": "by VIDVOX",
	"ISFVSN": "2.0",
	"CATEGORIES": [
		"TEST-GLSL"
	]
}*/

void main() {
	gl_FragColor = vec4(isf_FragNormCoord.x,isf_FragNormCoord.y,0.0,1.0);
}
The output of this example should vary red over the x-axis and green over the y-axis. While not particularly interesting, rendering the coordinate space in this fashion is often useful in debugging more complicated shaders.
In the ISF References Pages you can find a list of automatic uniforms in ISF and built-in functions.
Timed Animations
 Timed animation loop in ISF Editor preview
 Next create another shader called "Timed Animation.fs" and paste in the following code:
/*{
	"DESCRIPTION": "Test animation",
	"CREDIT": "by VIDVOX",
	"ISFVSN": "2.0",
	"CATEGORIES": [
		"TEST-GLSL"
	]
}*/

void main() {
	float val = (isf_FragNormCoord.x < fract(TIME)) ? 1.0 : 0.0;
	gl_FragColor = vec4(1.0,0.5,0.75,val);
}
This code uses the TIME uniform variable to animate the output. When the x position of the current coordinate is less than the fraction part of the time in sections the image is filled in with our color, otherwise the pixel is transparent.
Further discussion and examples can be found in the ISF Primer chapter on automatically created uniform variables.
Adding Interface Controls
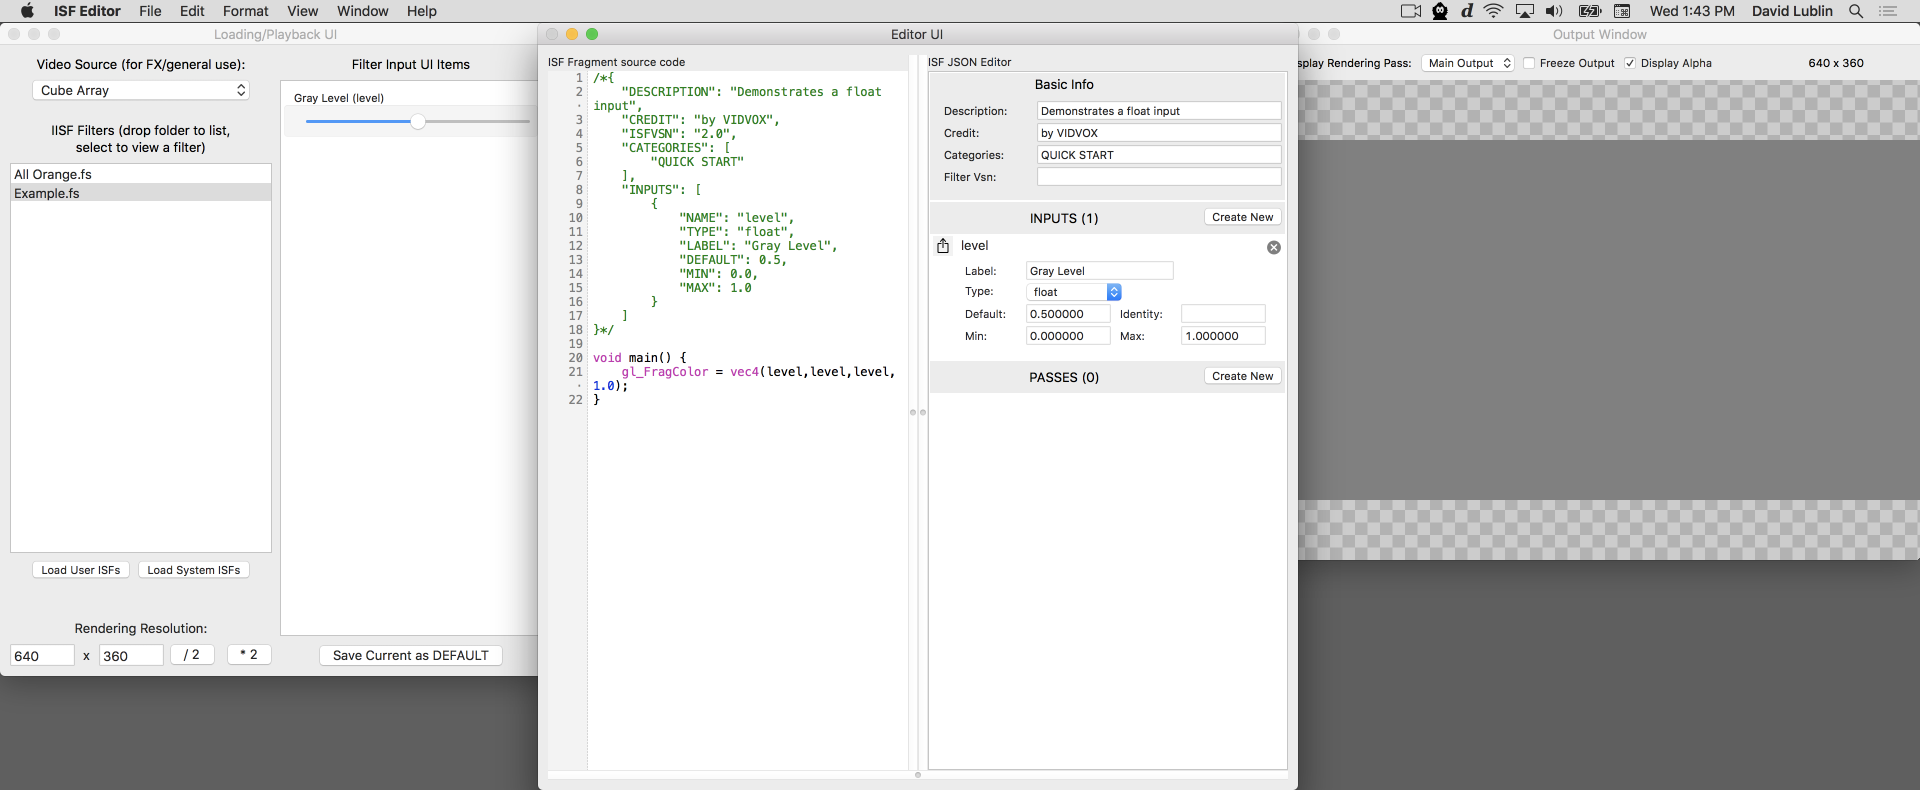 Adding inputs in the ISF Editor.
 One of the most powerful aspects of ISF is the ability to declare uniform variables such that a host application can automatically create the appropriate interface input controls. For example a float type is typically represented as a slider or knob, whereas a bool would be represented by an on / off toggle button.
Going back to our first example, we could add a single uniform variable to this by adding the INPUTS attribute to the JSON section.
You can either create a new shader for this, or modify the "myshader.fs" that you've already started.
/*{
	"DESCRIPTION": "Demonstrates a float input",
	"CREDIT": "by VIDVOX",
	"ISFVSN": "2.0",
	"CATEGORIES": [
		"TEST-GLSL"
	],
	"INPUTS": [
		{
			"NAME": "level",
			"TYPE": "float",
			"LABEL": "Gray Level",
			"DEFAULT": 0.5,
			"MIN": 0.0,
			"MAX": 1.0
		}
	]
}*/

void main() {
	gl_FragColor = vec4(level,level,level,1.0);
}
Looking in the INPUTS section, there is a single element with several attributes. The two that are required here are NAME and TYPE which are set to "level" and "float" respectively.
Additional the optional LABEL, MIN, MAX and LABEL attributes are included here.
Now instead of the "float" option for TYPE, try this code which uses the "color" option which provides a vec4 uniform variable.
/*{
	"DESCRIPTION": "Demonstrates a color input",
	"CREDIT": "by VIDVOX",
	"ISFVSN": "2.0",
	"CATEGORIES": [
		"TEST-GLSL"
	],
	"INPUTS": [
		{
		  "NAME" : "colorValue",
		  "TYPE" : "color",
		  "DEFAULT" : [
			1.0,
			0.5,
			0.25,
			1.0
		  ]
		}
	]
}*/

void main() {
	gl_FragColor = colorValue;
}
The ISF JSON Reference contains a detailed listing of the various supported input types and attributes which includes conventions for passing in both scalar types like float and bool, vector types like vec2 (for points) and vec4 (for colors), and special types like image and audio data.
Further discussion and examples can be found in the ISF Primer chapter on the anatomy of an ISF composition.
Making Image Effect Filters
 Adding an image input in the ISF Editor to create an FX.
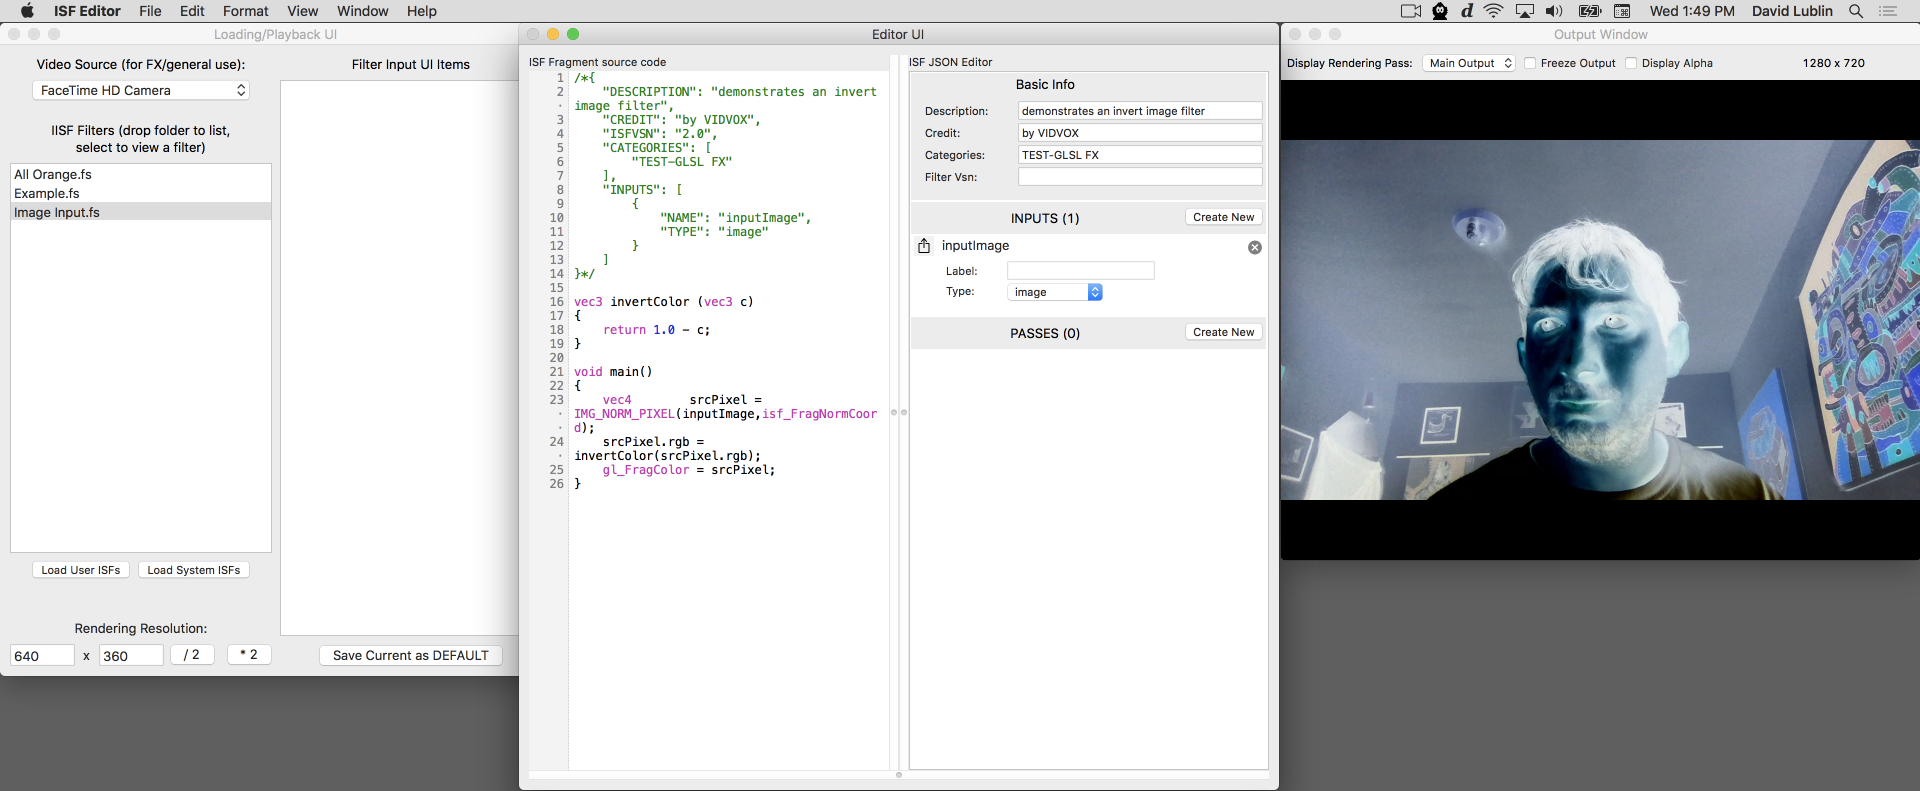
 Part of the ISF specification is a convention for declaring compositions as effects filters which are meant to process incoming image data. This is accomplished by including an input with the TYPE set to "image" and setting the NAME to "inputImage".
Create a new shader and save it with the name "firstFX.fs".
As an important note, if you are on a Mac, be sure to save this file to the "~/Library/Graphics/ISF" directory if you would like this effect to be available to host application software. In the ISF Editor for Mac there is a button in the interface to quickly navigate the browser to this directory.
Now copy and paste the following code into your editor and save the file:
/*{
	"DESCRIPTION": "demonstrates an invert image filter",
	"CREDIT": "by VIDVOX",
	"ISFVSN": "2.0",
	"CATEGORIES": [
		"TEST-GLSL FX"
	],
	"INPUTS": [
		{
			"NAME": "inputImage",
			"TYPE": "image"
		}
	]
}*/

vec3 invertColor (vec3 c)
{
	return 1.0 - c;
}

void main()
{
	vec4		srcPixel = IMG_NORM_PIXEL(inputImage,isf_FragNormCoord);
	srcPixel.rgb = invertColor(srcPixel.rgb);
	gl_FragColor = srcPixel;
}
This very simple example demonstrates the two important details when creating image filters:
- Including the "inputImage" as an element in the
INPUTSsection of the JSON blob. - Using the
IMG_NORM_PIXEL()function to get the color of a particular normalized pixel. Within ISF, this function and its non-normalized counterpartIMG_PIXEL()replace the functionstexture2D()ortexture2DRect(). More information can be found on the ISF built-in functions reference page.
ISF compositions can include more than one image input, making it possible to pass in additional data to be used for things like masking and distortion effects. Additional information on declaring image inputs and the image filter convention can be found in the ISF JSON Reference.
Including Vertex Shaders
Though not required, ISF allows for compositions to include an optional vertex shader. This can be useful when creating compositions that make use of pixel look up for convolution kernels or other operations that are best applied as vertex manipulation stage.
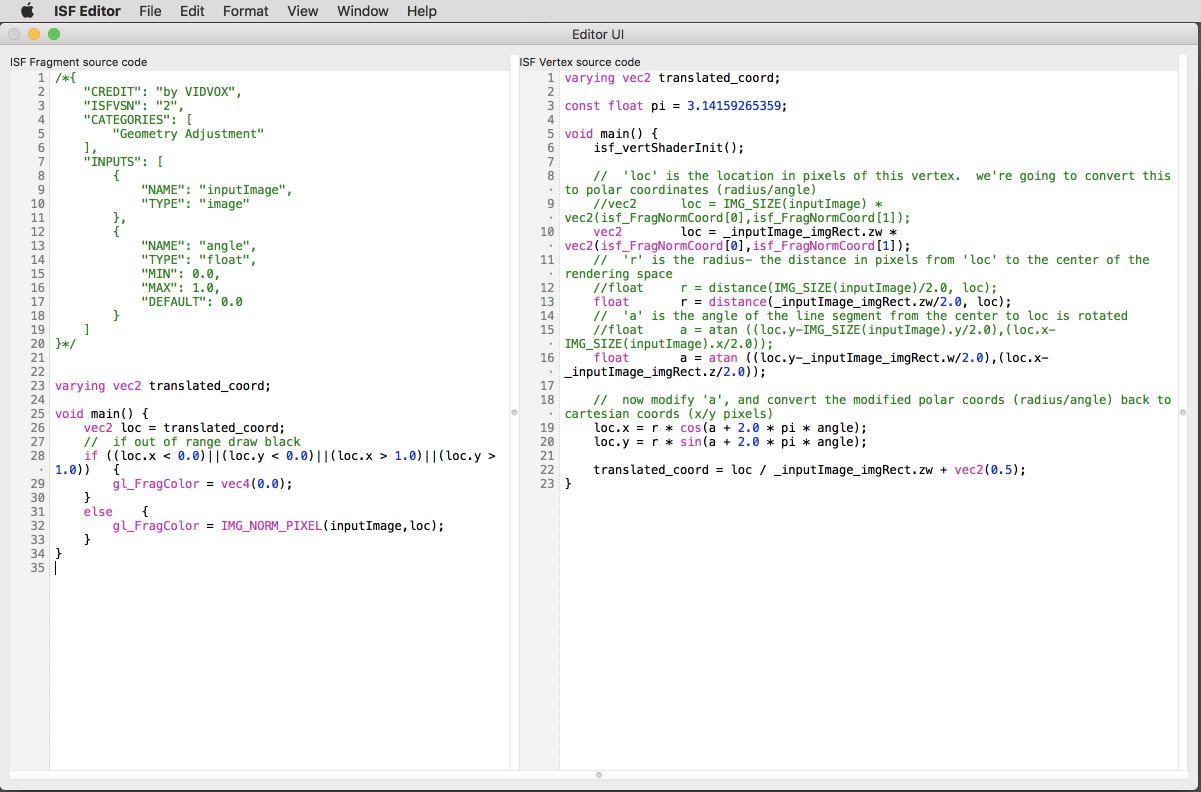 Editing Vertex Shader in the ISF Editor.
 The convention for using a vertex shader within ISF is to simply create a file with the same name as your fragment shader but with a ".vs" extension.
Here we will create a pair of files called "passthru.fs" and "passthru.vs" as a starting point for an ISF that uses a vertex shader.
If you are using the ISF Editor for Mac or the web, instead of creating a new text file, simply go to the VS tab within the editor panel and save the document; the .vs file will automatically be created for you.
For the vertex shader, copy and paste the following code:
//	passthru.vs
//	put your code in the main() {} function

varying vec2 translated_coord;

void main()
{
	//	make sure to call this in your custom ISF shaders to perform initial setup!
	isf_vertShaderInit();
	translated_coord = isf_FragNormCoord;
}
And it match up with a corresponding boring passthru.fs that looks like this:
//	passthru.fs
/*{
	"DESCRIPTION": "Passes through each pixel",
	"CREDIT": "by VIDVOX",
	"ISFVSN": "2",
	"CATEGORIES": [
		"TEST-GLSL FX"
	],
	"INPUTS": [
		{
			"NAME": "inputImage",
			"TYPE": "image"
		}
	]
}*/

varying vec2 translated_coord;

void main() {
	//	uses the translated_coord provided from the .vs
	gl_FragColor = IMG_NORM_PIXEL(inputImage,translated_coord);
}
The two important details here are:
- When including your own vertex shader, make sure to include the
isf_vertShaderInit();that tells the host application to do any initial setup. - In this pair of shaders, the
varyingvariable is used to pass data from the vs to the fs and it is declared in both documents.
Within the fragment shader, instead of using the traditional isf_FragNormCoord as our coordinate, the translated_coord variable passed from the vertex shader is used instead. This allows us to do translations to our coordinate system within the vertex shader such that they don't need to be recomputed for every render pass to the fragment shader.
Also note that any uniform variables declared in the JSON section of the fragment shader are also automatically available to the vertex shader.
Further discussion and examples can be found in the ISF Primer chapters on using vertex shaders to create a rotation effect and using vertex shaders in convolution filters.
Multiple Passes
While GLSL is incredibly powerful, some advanced composition ideas require combining the results of multiple shader compositions at different resolutions in order to create a final output. ISF adds a convention for creating shaders that have multiple render passes that can reference each other making it possible to make complex creations.
Like with other properties we have seen so far, setting up multiple render passes involves adding something to both our JSON blob and our GLSL code.
From the set of ISF Tests + Tutorial shaders is the "Test-MultiPassRendering.fs" example of using multiple render passes:
/*{
	"DESCRIPTION": "demonstrates the use of two-pass rendering- the first pass renders to a persistent buffer which is substantially smaller than the res of the image being drawn.  the second pass renders at the default requested size and scales up the image from the first pass",
	"CREDIT": "by zoidberg",
	"ISFVSN": "2.0",
	"CATEGORIES": [
		"TEST-GLSL FX"
	],
	"INPUTS": [
		{
			"NAME": "inputImage",
			"TYPE": "image"
		}
	],
	"PASSES": [
		{
			"TARGET":"bufferVariableNameA",
			"PERSISTENT": true,
			"WIDTH": "$WIDTH/16.0",
			"HEIGHT": "$HEIGHT/16.0"
		},
		{

		}
	]

}*/

void main()
{
	//	first pass: read the "inputImage"- remember, we're drawing to the persistent buffer "bufferVariableNameA" on the first pass
	if (PASSINDEX == 0)	{
		gl_FragColor = IMG_THIS_NORM_PIXEL(inputImage);
	}
	//	second pass: read from "bufferVariableNameA".  output looks chunky and low-res.
	else if (PASSINDEX == 1)	{
		gl_FragColor = IMG_THIS_NORM_PIXEL(bufferVariableNameA);
	}
}
The three important details here are:
- The addition of the
PASSESarray to the JSON section of our composition. Here there are defined two passes.- The first renders at 1/16th of the final output and has a special
TARGETname set to "bufferVariableNameA" which allows other render passes to access it. - The second and final render pass has no included attributes and will have a
RENDERSIZEequal to the final output, as determined by the host application (for an image filter typically this will be the same resolution as the "inputImage".
- The first renders at 1/16th of the final output and has a special
- Within the GLSL code, the new automatic variable
PASSINDEXis available for determining which render pass is currently being executed. Like with other uniform variables you can use this in both the fragment and vertex shader stages. - Within the GLSL code, in addition to the "inputImage" variable, the "bufferVariableNameA" is used along with the
IMG_THIS_NORM_PIXELfunctions to access pixel data across render passes.
The ISF JSON Reference contains a detailed information on declaring multiple render passes. Further discussion and examples can be found in the ISF Primer chapter on multiple render passes.
Persistent Buffers
Another useful way that ISF extends GLSL is with persistent buffers which make it possible to retain image data between render passes.
Persistent buffers are an optional attribute that can be attached to any element in the PASSES section of the JSON blob.
From the set of ISF Tests + Tutorial shaders is the "Test-PersistentBuffer.fs" example of using persistent buffers:
/*{
	"DESCRIPTION": "demonstrates the use of a persistent buffer to create a motion-blur type effect. also demonstrates the simplest use of steps: a one-step rendering pass",
	"CREDIT": "by zoidberg",
	"ISFVSN": "2.0",
	"CATEGORIES": [
		"TEST-GLSL FX"
	],
	"INPUTS": [
		{
			"NAME": "inputImage",
			"TYPE": "image"
		},
		{
			"NAME": "blurAmount",
			"TYPE": "float"
		}
	],
	"PASSES": [
		{
			"TARGET": "bufferVariableNameA",
			"PERSISTENT": true,
			"FLOAT": true
		}
	]

}*/

void main()
{
	vec4		freshPixel = IMG_THIS_PIXEL(inputImage);
	vec4		stalePixel = IMG_THIS_PIXEL(bufferVariableNameA);
	gl_FragColor = mix(freshPixel,stalePixel,blurAmount);
}
In this code, the result of each execution of the shader is stored in "bufferVariableNameA", which is then used in the next pass. The "blurAmount" variable specifies how much to mix between the new pixel and the old one. This technique is often used to create feedback style effects.
Though not supported by all renderers, the optional FLOAT attribute can be included to create a 32-bit buffer. This will use up more memory but will store information more accurately between render passes.
Further discussion can be found in the ISF Primer chapter on persistent buffers including examples of creating feedback effects and a Conway's Game of Life in GLSL.
Audio Waveforms and Audio FFT Data
 Shader with raw audio and FFT waveform inputs in the ISF Editor.
 Though GLSL as a language has no concept of sound data, many developers have found ways to writes audio-visualizers by converting audio into a format that can be passed to shaders. As one of its extensions to the language, ISF includes a standard way for host software to pass in audio waveforms and FFT information for this purpose.
Like with image data, audio inputs are declared in the INPUTS section of the JSON blob with a special TYPE set to "audio" or "audioFFT". The ISF JSON Reference contains detailed information about the format in which this data is packed and available optional attributes.
From the "ISF tests+tutorials" is this simple audio visualizer shader. In addition to the declared waveImage audio input is an options for setting the wave size and output display style called waveSize.
/*
{
  "CATEGORIES" : [
    "Generator"
  ],
  "DESCRIPTION" : "Visualizes an audio waveform image",
  "INPUTS" : [
    {
      "NAME" : "waveImage",
      "TYPE" : "audio"
    },
    {
      "NAME" : "waveSize",
      "TYPE" : "float",
      "MAX" : 0.5,
      "DEFAULT" : 0.05,
      "MIN" : 0
    }
  ],
  "CREDIT" : "by VIDVOX"
}
*/

void main() {
	//	just grab the first audio channel here
	float		channel = 0.0;

	//	get the location of this pixel
	vec2		loc = isf_FragNormCoord;

	//	though not needed here, note the IMG_SIZE function can be used to get the dimensions of the audio image
	//vec2		audioImgSize = IMG_SIZE(waveImage);

	vec2		waveLoc = vec2(loc.x,channel);
	vec4		wave = IMG_NORM_PIXEL(waveImage, waveLoc);
	vec4		waveAdd = (1.0 - smoothstep(0.0, waveSize, abs(wave - loc.y)));
	gl_FragColor = waveAdd;
}
To pass audio data into shaders, the audio samples are converted into pixel information and packed into an image. This image is then passed into the shader like any other. The IMG_SIZE() function can be used to get the dimensions. The the y-axis representing individual channels and x-axis contains the raw audio samples for each channel. From here, the IMG_NORM_PIXEL() or IMG_PIXEL() functions can be used to read the sample data.
The "audioFFT" type works in a similar fashion, with the results packed into an image where the y-axis representing individual channels and the x-axis holding the results for individual frequency bins.
Further discussion and examples can be found in the ISF Primer chapter on working with audio and audio FFTs.
Converting Non-ISF GLSL Shaders to ISF
In many cases, GLSL code can be easily adapted to ISF by adding the JSON blob and making a few minor changes to a few function and variable names.
For example, if you are coming from an environment like The Book of Shaders or Shader Toy, the variable that they use for the time in seconds might be something like u_time or iTime and you would simply need to change those to TIME to work in ISF.
Here is a list of tips that address many of the common differences:
- You should probably replace any calls in your shader to
texture2D()ortexture2DRect()withIMG_NORM_PIXEL()orIMG_PIXEL(), respectively. Images in ISF- inputs, persistent buffers, etc- can be accessed by eitherIMG_NORM_PIXEL()orIMG_PIXEL(), depending on whether you want to use normalized or non-normalized coordinates to access the colors of the image. If your shader isn't using these- if it's usingtexture2D()ortexture2DRect()- it won't compile if the host application tries to send it a different type of texture. - If the shader you are converting makes use of any custom uniform variable declarations for receiving information from a host application, replace these with elements in the
INPUTSsection of your JSON blob. - Many shaders pass in the resolution of the image being rendered (knowing where the fragment being evaluated is located within the output image is frequently useful). By default, ISF automatically declares a uniform vec2 named
RENDERSIZEwhich is passed the dimensions of the image being rendered. - If the shader you're converting requires a time value, note that the uniform float
TIMEis declared, and passed the duration (in seconds) which the shader's been runing when the shader's rendered. - Many shaders don't use (or even acknowledge) the alpha channel of the image being rendered. There's nothing wrong with this- but when the shader's loaded in an application that uses the alpha channel, the output of the shader can look bizarre and unpredictable (though it usually involves something being darker than it should be). If you run into this, try setting gl_FragColor.a to 1.0 at the end of your shader.
gl_FragCoord.xycontains the coordinates of the fragment being evaluated.isf_FragNormCoord.xycontains the normalized coordinates of the fragment being evaluated.- While ISF files are fragment shaders, and the host environment automatically generates a vertex shader, you can use your own vertex shader if you'd like. If you go this route, your vertex shader should have the same base name as your ISF file (just use the extension .vs), and the first thing you do in your vertex shader's main function is call
isf_vertShaderInit();. - If the shader you're converting requires imported graphic resources, note that the ISF format defines the ability to import image files by adding objects to your JSON dict under the
IMPORTEDkey. The imported images are accessed via the usualIMG_PIXEL()orIMG_NORM_PIXEL()methods. Details on how to do this are listed in the full specification and ISF Reference Pages. - If your texture doesn't look right, make sure your texture coordinates are ranged properly (textures are typically "clamped" by the host implementation, if you specify an out-of-range texture coordinate it may look funny).
Further discussion and examples can be found in the ISF Primer chapter on adapting existing GLSL code to the ISF specification.
Next Steps
This page was designed to demonstrate some of the core ideas of the Interactive Shader Format as quickly as possible - but there is a lot more to learn, both about ISF and GLSL.
Here are a few resources you may want to check out next:
- Read the ISF Primer for further discussion and examples of many of the topics on this page. It also includes lessons covering some of the basics of GLSL programming and how to take advantage of commonly used techniques.
- The ISF Reference Pages are a useful resource for quickly finding information about automatically declared uniforms, built-in functions and other related materials.
- Visit the ISF Sharing Site where you can find lots of compositions to learn from, remix, or just use directly in host applications.
- The full ISF Specification Page contains detailed information for developers.